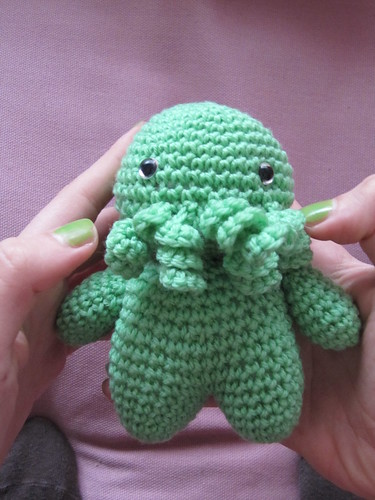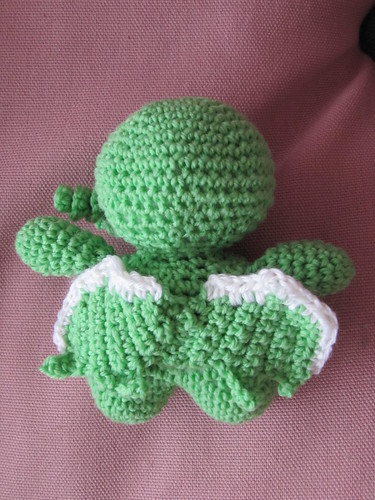
Ecco l'ultimo arrivato: Baby Chtulhu! Fa un po' il prepotente con gli altri amigurumi...
Qui il pattern, che ho modificato un poco per fargli anche le gambe.
Here's the new born: Baby Cthulhu! He's a little bossy with the other amigurumis...
Here's the pattern, I modified it a little to make him the legs too.

Ecco il pattern modificato:
Here's the modified pattern:
Special Stitches
In the pattern I’m going to call the Cthulhu’s tentacles a coil. When you see coil, do this:
coil: chain 9, 3 sc in third chain space from hook, 3 sc in each of next six spaces.
If you find the chain spaces too small to work 3 single crochets in, try making the chain with a hook that’s one size larger.
Head
6 sc in a magic ring
RND 1: work 2 sc in each st around. (12 stitches)
RND 2: *sc in first st, 2 sc in next st*, repeat around (18 stitches)
RND 3: *sc in first 2 st, 2 sc in next st*, repeat around (24 stitches)
RND 4: *sc in first 3 st, 2 sc in next st*, repeat around (30 stitches)
RND 5: *sc in first 4 st, 2 sc in next st*, repeat around (36 stitches)
RND 6: *sc in first 5 st, 2 sc in next st*, repeat around (42 stitches)
For RNDs 7-10 sc into each st around (42 stitches)
RND 11: (tentacle round!) sc in first 17 st, *coil, sc in next 2 st* repeat 5 times (so you have five tentacles), sc in each st to end of round. (42 stitches)
RND 12: sc in each st around (42 stitches) Note: If you have less than 42 that’s okay because we’re about to start decreasing, if you have more than 42 go back and try to fix the problem.
RND 13: *sc in first 5 st, dec in next st,* repeat around (36 stitches)
RND 14: *sc in first 4 st, dec in next st,* repeat around (30 stitches)
RND 15: *sc in first 3 st, dec in next st,* repeat around (24 stitches)
place safety eyes, using photos as a guide.
RND 17: *sc in first 2 st, dec in next st,* repeat around (18 stitches)
RND 18: *sc in first st, dec in next st* repeat around (12 stitches)
Fasten off.
Legs:
6 sc in a magic ring
RND 1: work 2 sc in each st around. (12 stitches)
RND 2: *sc in first st, 2 sc in next st*, repeat around (18 stitches)
For RNDs 3-6 sc into each st around (18 stitches)
Join with slip stitch, finish off leaving a long tail for sewing the legs together.
Make the second leg, don't finish it off. Whip stitch the two legs together using your yarn needle through 6 stitches. Your working loop should be on the outside of the circle and not stitched through. Close off the yarn. You should have an eight-like shape of 30 st. Continue working the body.
For RNDs 7-11 sc into each st around (30 stitches)
RND 12:*sc in first 3 st, dec in next st,* repeat around (24 stitches)
RND 13:*sc in first 2 st, dec in next st,* repeat around (18 stitches)
RND 14: *sc in first st, dec in next st,* repeat around. (12 stitches)
Finish off.
Sew head and body together
Arms (make 2)
4 sc in magic ring
RND 1: work 2 sc in each st around (8 stitches)
RND 2: *sc in first st, 2 sc in next st*, repeat around (12 stitches)
switch to shirt colour for next round, if making a shirt.
RNDs 3-5: sc in each st around (12 stitches)
sl st into next stitch, finish off leaving long tail for sewing.
Wings (make two)
Ch 4. Turn and do 1 sc in each of next 3 ch sps. Ch 1, turn. 3 sc, ch 4. turn. 3 sc on chain, 3 hdc on the three sc. Ch1, turn. 3 sc, ch 5, 4 sc in chain, 3 hdc. Ch1, turn. 4 sc, ch 6, 5 sc in chain, 4 hdc. Ch 3 *Work appox. 8 dc along the top edge of the wing (opposite the pointy bits). Sl St into first Ch, or near first Ch. Fasten off.

8 commenti:
That is adorable! Thanks for sending me the link. I really like how he looks with the legs. Could you explain how you modified the pattern to make the legs? Either post more here on your blog, or send another comment to my blog. I'd love to try making one like this sometime. Great work!
amber
http://cthulhucrochet.blogspot.com/
I'm so glad you liked it! I'll post the pattern later this afternoon.
You should put how you modified the arms in there too. You made them quite a bit longer than the initial pattern as well. I had to just extrapolate from the pics.
Once I finish it, I'll send you a link to my pic.:)
Thank you very much Jade, I'll fix it as soon as I can!
Maybe it is a little late, since it has passed almost a year, but... I loved your pattern and since you said you wanted to see, Here: http://www.craftster.org/pictures/data/500/medium/249747_10May11_IMG_7466.JPG
and here: http://www.craftster.org/pictures/data/500/medium/249747_10May11_IMG_7464.JPG
I hope you like them. =o)
Thanks, really really really, for sharing.
It's become very obvious to me going through this pattern, that you have made very many changes without writing the new instructions. I can count right in your picture that the arms have about 8 rows and decrease after the several rows of 12 sts. The payeepa does not reflect this. Also the wings look nothing like what is pictured. You copy pasted someone else's pattern but put your own work as the picture...
Online casino no deposit bonus codes | Karangpintar
Karangpintar offers the most exciting 온카지노 new games that are waiting for you. Free 1xbet casino no deposit bonuses can be found in several different choegocasino casinos,
I love how you modified this pattern to include legs!
Posta un commento